Capturing the enigmatic beauty of underwater environments is a thrilling aspect of videography. This guide delves into how water clarity affects footage and offers insights for utilising advanced cameras like the GoPro Hero12 and DJI Action 4, highlighting the role of Seavu in enhancing these experiences.
The Science of Water Clarity
Water clarity influences the amount of light that penetrates the water and significantly impacts how images are captured. It is affected by particulates such as sediments and plankton, which absorb or scatter light. Clear water allows for deeper light penetration, producing crisper and more vibrant footage. In contrast, murky water reduces visibility and dims colours, presenting unique challenges.
Technical Adjustments for Clarity Variations
Favourite Shots in Clear Water Conditions
Enhancing Techniques with GoPro Hero12 and DJI Action 4
These cameras are equipped with auto white balance, aiding quick adaptation to changing underwater lighting conditions. However, manually adjusting the white balance often yields better results, offering more precise control over colour correction. Despite the auto white balance, using filters can further improve colour accuracy.
Post-Production Tips
Post-production is essential in underwater videography. Utilise tools for colour correction to adjust hues distorted by water, and apply noise reduction to clean up footage shot at high ISOs in low clarity conditions.
Conclusion
Understanding and adjusting for water clarity are crucial to successful underwater videography. By mastering camera settings and using the right accessories, videographers can capture stunning underwater footage, revealing the hidden wonders of aquatic environments.
Dive into the underwater world with your GoPro Hero12 or DJI Action 4, and enhance your experience using Seavu for live underwater viewing. For more information on how Seavu products can transform your underwater filming adventures, visit Seavu
Underwater fishing photography is a captivating art form that allows you to capture the excitement and beauty of the underwater world while showcasing the thrill of catching fish. In this blog post, we will delve into the art of underwater fishing photography and provide you with valuable tips on composition, lighting, and capturing the unique underwater environment. We will also introduce you to the innovative Seavu product, which will enhance your underwater fishing photography experience and help you capture stunning moments beneath the surface.
Composition is key when it comes to underwater fishing photography. Before diving in, take a moment to visualise the shot you want to capture. Consider the positioning of the fish, the angler, and the surrounding elements. Aim for a balanced composition and utilise the rule of thirds to create a visually pleasing image. Experiment with different angles and perspectives to add depth and interest to your photographs.
Lighting plays a crucial role in underwater photography. Take advantage of natural light to capture the vibrant colours of the underwater environment. Time your dives during the golden hour, when the sun is low in the sky, to achieve warm and soft lighting. Avoid harsh midday sunlight, as it can create unflattering shadows and washed-out colours. If necessary, use filters or adjust the white balance settings on your camera to compensate for the colour loss caused by the water.
To truly capture the thrill of catching fish, get close to the action. Use a wide-angle lens or a fisheye lens to capture the underwater scene in its entirety. By getting close to the subject, you can emphasise the size and power of the fish, as well as the intensity of the angler’s reactions. Remember to maintain a safe distance from the fish and respect their natural habitat while capturing these captivating moments.
Don’t just focus on the fish and the angler; capture the beauty of the underwater environment as well. Include elements such as coral reefs, seagrass, or rocky structures in your frame to provide context and add interest to your photographs. These elements not only enhance the overall composition but also showcase the unique underwater ecosystem in which fishing takes place.
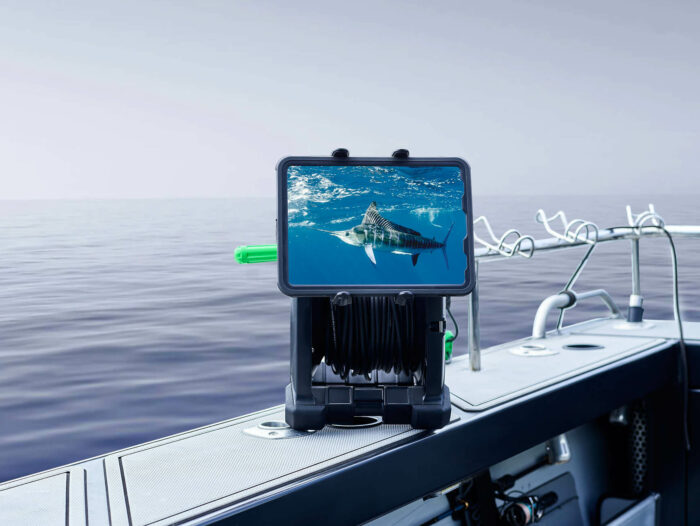
The Seavu product is a game-changer for underwater fishing photography. With its innovative design and features, it allows you to capture stunning moments beneath the surface with ease and convenience. The Seavu Underwater Camera System offers real-time livestream capabilities, enabling you to view and capture underwater footage on your mobile device. Its compatibility with action cameras like GoPro ensures high-quality imaging and video recording. With Seavu, you can document your fishing adventures and share them in real-time with friends and fellow fishing enthusiasts.
Unveiling the hidden world of underwater fishing through photography is an art that requires skill, patience, and an understanding of the unique challenges and opportunities that come with shooting underwater. By following these tips on composition, lighting, and capturing the underwater environment, you can create captivating photographs that showcase the thrill of fishing beneath the surface. And with the Seavu Underwater Camera System, you can elevate your underwater fishing photography experience by capturing and livestreaming your adventures in real-time. Embrace the hidden world and capture the essence of underwater fishing with your camera and the revolutionary Seavu product.
We hope you found these underwater fishing photography tips useful.
Happy fishing!
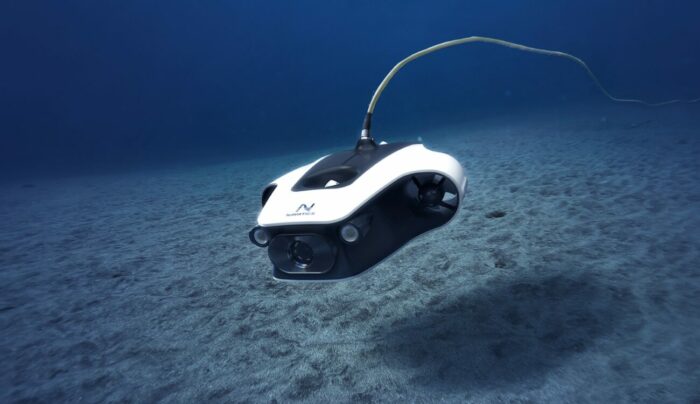
Over the years, fishing has witnessed the integration of various technologies aimed at enhancing the experience and improving success rates. Among these emerging technologies, underwater drones, often referred to as ROVs (Remotely Operated Vehicles), have sparked considerable interest. These devices offer an unprecedented view into the aquatic world, opening up new possibilities for anglers. However, as with any technology, they are not without their limitations. Let’s dive deeper into the world of underwater drones and explore their pros and cons in fishing.
Underwater drones are capable of diving deep into water bodies, capturing high-resolution video footage and still images of the underwater environment. Equipped with powerful propellers, these drones can navigate through strong currents and around underwater structures, providing a real-time view of what’s happening beneath the water’s surface. For anglers, this means the ability to scout out potential fishing spots, identify the species present, and even observe fish behavior—all without casting a line.
Despite the exciting prospects offered by underwater drones, they are not without drawbacks. Here are some of the key limitations that come into play when using these devices for fishing:
Before deploying an underwater drone for fishing, it’s crucial to be aware of the legal restrictions in place. In many regions, there are regulations governing the use of drones (both aerial and underwater) in public water bodies. These rules can limit where and when you can use your drone, potentially restricting their utility for fishing.
While underwater drones can dive deep and navigate challenging underwater environments, they are limited by their battery life. Most drones can operate for one to four hours on a single charge, depending on their design and the conditions they’re used in. This limited operational time can restrict how much you can explore and how far the drone can travel from its base station.
Underwater drones rely on a tethered connection to their base station to transmit video feeds and receive control signals. However, this connection can be affected by interference from various sources, including other electronic devices, marine equipment, and even natural elements in the water. Any interruption in the signal can result in loss of control, limiting the drone’s effectiveness.
There are also concerns about the potential impact of underwater drones on aquatic environments and wildlife. The noise and light produced by these devices can disrupt marine life, and there is always the risk of entanglement with aquatic plants or debris.
High-quality underwater drones can be costly, with prices ranging from several hundred to a few thousand dollars. This investment may not be justifiable for casual anglers or those who only fish occasionally.
Underwater drones present exciting possibilities for anglers, offering a new perspective on the aquatic world and potentially improving the success of fishing trips. However, their limitations, ranging from legal restrictions and battery life to signal interference, environmental impact, and cost, cannot be overlooked. Therefore, when considering an underwater drone for fishing, it’s important to weigh these factors against the potential benefits to determine if it’s the right choice for you.
Underwater fishing adventures offer a captivating experience, and capturing the underwater world has become more accessible with advancements in technology. In this blog post, we will compare Seavu, a versatile underwater livestream solution, with underwater drones specifically for fishing purposes. By exploring the pros and cons of each option, you can make an informed decision about the best tool to enhance your underwater fishing experiences.
Seavu offers several advantages tailored to underwater fishing
Cost-Effectiveness and Accessibility: Seavu provides an affordable option for capturing underwater footage by utilizing your existing action camera, such as a GoPro. This makes it accessible to a wide range of fishing enthusiasts, eliminating the need for additional expensive equipment.
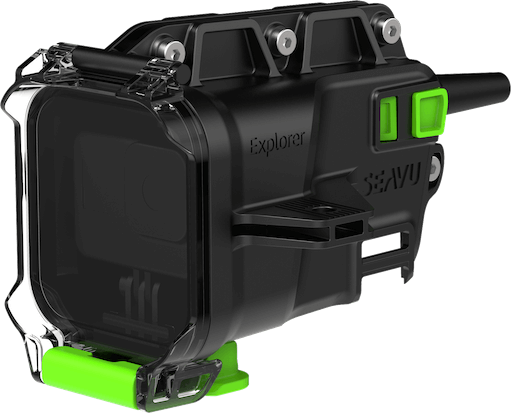
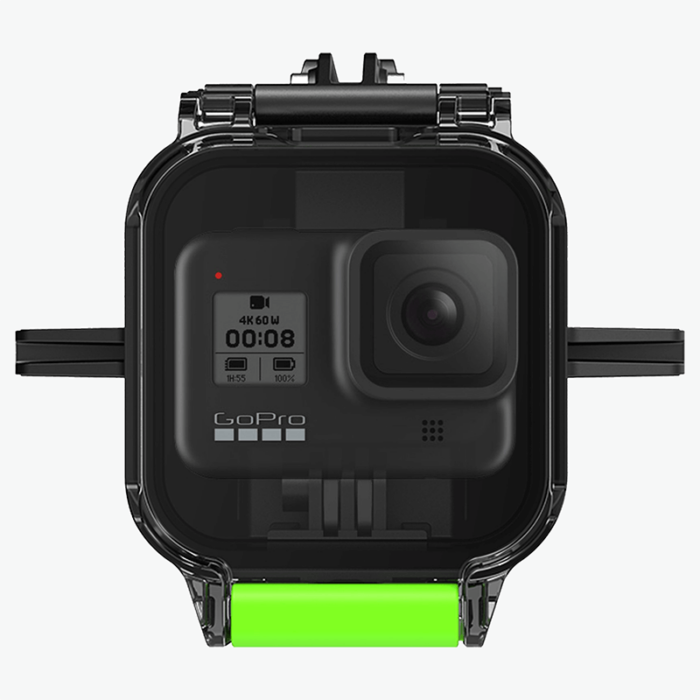
Easy Setup and Operation: With its plug-and-play functionality, Seavu is designed for user-friendliness. Setting it up and getting started with livestreaming underwater footage is a hassle-free process, allowing you to focus more on your fishing adventure. Simply insert your action camera into the Seavu Explorer case, and you’re ready to dive into the underwater world.
Real-Time Livestreaming: Seavu allows you to livestream underwater footage in real-time to your mobile device. This feature provides immediate visibility into underwater activity, enabling you to monitor fish behaviour and make well-informed fishing decisions on the spot. You can observe fish strikes, explore fishing grounds, track the movements of schools of fish, and adjust your fishing strategies accordingly, all in real-time.
Customization and Versatility: Seavu’s modular accessory clip system enables customization based on your fishing preferences. You can easily attach accessories like trolling fins, bait release clips, or pole mounts to tailor the system to your specific fishing techniques. This level of customization increases your chances of success and allows you to adapt to different fishing scenarios. Whether you’re trolling, casting, or drop fishing, Seavu can be customised to meet your specific needs.
Underwater drones, also known as underwater ROVs (remotely operated vehicles), provide unique advantages for fishing enthusiasts
Remote Exploration of Fishing Spots: Underwater drones allow for remote exploration of potential fishing spots. Equipped with high-resolution cameras, these drones provide a bird’s-eye view of the underwater landscape, enabling you to identify underwater structures, locate schools of fish, and scout the perfect fishing location without submerging yourself.
Precise Underwater Manoeuvrability: Underwater drones offer precise control and manoeuvrability, allowing you to navigate tight spaces and manoeuvre around submerged structures. This capability ensures that you can reach areas that may be difficult to access with traditional fishing gear, expanding your fishing opportunities.
Potential Drawbacks of Underwater Drones
While underwater drones offer unique advantages, it’s important to consider the potential drawbacks specific to fishing.
Noise and Disturbance: Underwater drones can create noise and vibrations that may disturb marine wildlife. This disturbance can affect their natural behaviour and may interfere with the fishing experience.
User Distraction: Operating an underwater drone requires constant attention and focus, which can detract from the fishing experience. It may divert your attention from actively fishing and enjoying the surroundings, as you need to monitor and control the drone.
Limited Fishing Applications: Underwater drones are primarily designed for exploration purposes and are not optimized for specific fishing techniques like trolling. Their size and configuration is not be suitable for efficient trolling operations. Instead, underwater drones excel in tasks such as scouting and mapping fishing grounds while the boat is anchored.
Pros and Cons: Seavu vs. Underwater Drones for Underwater Fishing
Let’s examine the pros and cons of Seavu and underwater drones, specifically for underwater fishing:
Seavu Pros:
– Cost-effective and accessible solution
– Easy setup and operation
– Real-time underwater livestreaming capabilities
– Customizable with a modular accessory clip system
Seavu Cons:
– Limited range compared to underwater drones
Underwater Drone Pros:
– Remote exploration of fishing spots
– Precise underwater manoeuvrability
– Real-time underwater livestreaming capabilities
Underwater Drone Cons:
– Potential noise and disturbance to marine wildlife
– User distraction from fishing experience
– Limited fishing applications
When deciding between Seavu and an underwater drone for underwater fishing, consider your specific fishing needs and preferences. If you prioritize cost-effectiveness, ease of use, real-time livestreaming, immediate visibility, and customization, Seavu is an excellent choice. Its affordability, user-friendly design, and livestreaming capabilities make it a compelling option for underwater fishing enthusiasts. On the other hand, underwater drones offer remote exploration and precise manoeuvrability, but come with the potential drawbacks of noise, user distraction and are not suitable for all fishing applications.
Evaluate your priorities, budget, and fishing requirements to determine the best tool for capturing and livestreaming your underwater fishing adventures. Seavu provides a reliable and accessible solution, ensuring you can witness the underwater world in real-time while enjoying your fishing experience to the fullest.
In the era of social media and capturing life’s precious moments on the go, video editing apps have become essential tools for users. GoPro Quik and DJI Mimo are two popular apps that offer powerful editing features to enhance your photos and videos. In this blog, we will compare the features and functionalities of GoPro Quik and DJI Mimo, helping you make an informed choice based on your editing needs.
GoPro Quik is a versatile app that serves as an all-in-one solution for saving, editing, and sharing your photos and videos. It supports footage captured on GoPro cameras as well as your phone, making it convenient for users with different devices. Let’s take a closer look at the key features of GoPro Quik:
DJI Mimo is a comprehensive app designed to enhance your photos and videos captured with DJI products. It offers a range of powerful editing tools and intelligent modes to create stunning visual content. Let’s explore the key features of DJI Mimo:
Both GoPro Quik and DJI Mimo are feature-rich video editing apps that cater to different user preferences and camera setups. GoPro Quik is a versatile solution that supports various devices and provides easy-to-use editing tools, making it suitable for users with GoPro cameras or smartphones. On the other hand, DJI Mimo offers precise control over DJI products and incorporates intelligent modes and cinematic features, ideal for users specifically capturing footage with DJI cameras. Consider your editing needs, camera compatibility, and desired features to determine which app aligns better with your requirements. Whichever you choose, both GoPro Quik and DJI Mimo empower you to create captivating videos to share with your friends, family, and social media audience.
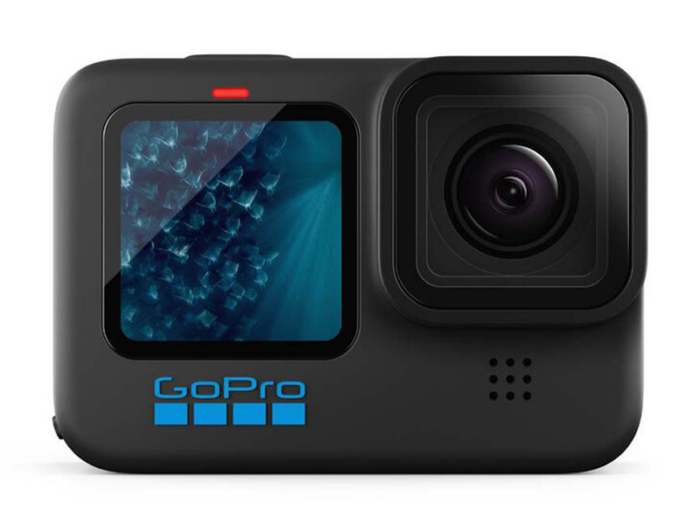
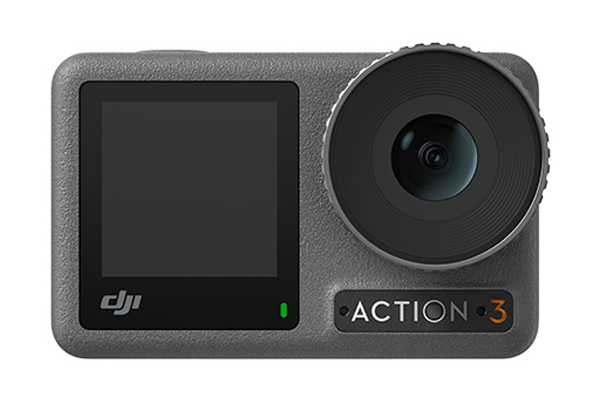
Whether you’re capturing adrenaline-filled action shots or peaceful moments in nature, the choice of the right action camera can make all the difference. The GoPro Hero 11 Black and the DJI Action 3 are two leading contenders in the market, each boasting a unique set of features. This comprehensive comparison should help you decide which camera is best suited for your adventures.
The GoPro Hero 11 Black continues GoPro’s legacy, integrating a new sensor and wider lens for a better field of view. Renowned for its superior image stabilization, it’s perfect for recording high-action sequences without losing image clarity.
– Ability to shoot in 5.3K video at up to 50fps, ideal for capturing details.
– Best-in-class image stabilization for smooth, action-packed recordings.
– Flexibility in shooting with an 8:7 sensor, allowing post-shoot adjustment between vertical and horizontal orientations.
– The front display is view-only, with no interactive controls.
The DJI Action 3 retains the classic action camera design while adding valuable features such as a front touchscreen and an excellent magnetic mounting system. Its superior low-light performance outshines many, making it an excellent choice for underwater and low-light photography.
– Front touchscreen provides user-friendly controls.
– Enhanced low-light performance is perfect for capturing clear images underwater or in dimly lit environments.
– Excellent magnetic mounting system for fast and secure attachment.
– Doesn’t support 5.3K or open gate shooting
While the Hero 11 Black excels in high-resolution recording and superior image stabilization, the DJI Action 3 shines in low-light conditions. It captures brighter and more detailed images even in challenging lighting, making it perfect for underwater and low-light photography.
Both cameras adhere to the traditional action camera design, boasting replaceable lens covers and waterproof features. The DJI Action 3 stands out with its magnetic mounting system that allows for quick adjustments, while the Hero 11 Black has a built-in mount. The DJI camera also has a functional front touchscreen, while the GoPro’s front screen is only for viewing.
Each camera comes equipped with a long-lasting, cold-weather resistant battery, with DJI’s Extreme battery holding a slight edge over GoPro’s Enduro in capacity. When it comes to weather resistance, DJI Action 3 outperforms with an operating temperature of -20 degrees celsius compared to GoPro’s -10 degrees rating.
The GoPro Hero 11 Black retails at a higher price point of $799, while the DJI Action 3 is priced at $529. However, with GoPro recently lowering the Hero 11 Black’s price to $649, the gap has significantly narrowed.
One crucial aspect of using action cameras that often goes overlooked is the functionality offered by their companion apps. Both GoPro and DJI provide companion apps, Quik and Mimo respectively, to enhance the usability of their cameras. However, there is a key difference that could influence your purchasing decision: the ability to live preview your footage while recording.
Since the GoPro Hero 9, the GoPro Quik app has unfortunately disabled the live preview feature while recording. This decision has been met with disappointment by many loyal GoPro users, as the live preview feature is particularly useful when the camera is mounted in a location that’s beyond reach, such as on a helmet, car, or drone.
On the other hand, the DJI Mimo app continues to support live preview during recording, even when capturing in 4K resolution. This feature provides users with real-time feedback on the footage being captured, allowing for instant adjustments to the camera angle, position, or settings to ensure the best possible results. This is particularly beneficial when the camera is mounted at a distance or in a hard-to-reach spot.
In this aspect, DJI Action 3 holds a significant edge over the GoPro Hero 11 Black. This can be a game-changing feature for action enthusiasts who rely heavily on app-based controls and live feedback.
See full livestream compatibility list.
The GoPro Hero 11 Black and the DJI Action 3 each have their unique strengths, appealing to different users based on their specific requirements. The Hero 11 Black is ideal for those seeking high-resolution recording and superior image stabilization. Meanwhile, the DJI Action 3, with its superior low-light performance and user-friendly interface, is a solid option for underwater or dimly lit environments. If live preview while recording is high on your priority list, the DJI Action 3 could be the better option for you.
Remember, the key to choosing an action camera is striking a balance between your needs, the camera’s features, and your budget. Each camera offers unique advantages, so select the one that best resonates with your adventure aspirations.
Capturing stunning underwater footage with your GoPro Hero 11 requires the right settings to ensure optimal image quality and colour accuracy. In this blog post, we will explore the recommended settings specifically tailored for underwater footage. From frame rate and resolution to white balance and colour profiles, these settings will help you unleash the full potential of your GoPro Hero 11 and produce consistently high-quality underwater videos.
Choose either 30 or 24 FPS for smooth motion and cinematic-like footage. Set the resolution to either 2.7K or 4K for greater detail and flexibility during editing.
Select the Wide option to capture a wider perspective and include more of the underwater scene in your footage.
Set HyperSmooth to AutoBoost to enable the built-in stabilisation feature, reducing camera shake and producing smoother underwater footage.
Turn on Pro Controls to unlock advanced settings and have full control over your GoPro Hero 11’s features.
Enable 10-Bit Colour to capture a broader range of colours and achieve more accurate colour grading during post-production.
Choose the High setting to ensure the highest quality video encoding and preserve fine details in your underwater footage.
Set the shutter speed to Auto, allowing the camera to adjust the exposure on the fly based on the available light.
Adjust EV Comp to -0.5 to slightly underexpose the footage and prevent highlights from being blown out in bright underwater environments.
Set the white balance to 4500K to maintain accurate colours underwater and avoid the footage looking green or purple. This preserves the natural blue tones of the underwater world.
Set the ISO min to 100 for the best image quality with minimal noise. Adjust the ISO max to 400 to account for low light conditions, avoiding excessive noise.
Choose either Low or Medium to retain details while minimising sharpening artifacts that can occur in underwater footage.
Select Flat for a desaturated colour profile, allowing greater flexibility in colour grading during post-processing. Alternatively, choose Natural for more vibrant and contrasty footage straight out of the camera.
Turn off RAW Audio to disable RAW audio recording and save storage space. Underwater audio is usually less important and can be supplemented with music or ambient sound in post-production.
Disable Wind Noise Reduction, as it is not necessary for underwater footage.
Set Wi-Fi Band to 2.4Ghz in order to livestream underwater footage with Seavu camera system. See full instructions on how to set camera Wi-Fi Frequency to 2.4Ghz.
With the recommended settings for underwater diving footage on your GoPro Hero 11, you can capture breathtaking videos that showcase the beauty of the underwater world. Adjusting frame rates, resolutions, white balance, and colour profiles, among other settings, gives you full control over your footage and ensures optimal image quality. Remember to experiment with different settings and accessories to find the perfect combination for your underwater adventures. Dive deep and capture the hidden wonders beneath the surface with your GoPro Hero 11!
DJI action cameras have gained popularity among adventure enthusiasts for their impressive image quality and robust features. Whether you’re snorkeling, diving, or exploring the underwater world, optimizing your DJI action camera settings for underwater conditions can make a significant difference in capturing stunning footage. In this blog post, we will guide you through the best settings to use on your DJI action camera for breathtaking underwater shots. From resolution and frame rate to color profiles and white balance, these settings will help you bring the underwater realm to life with exceptional clarity and vibrancy.
Selecting the right resolution and frame rate is crucial for capturing detailed and smooth underwater footage with your DJI action camera. Choose a high-resolution setting, such as 4K or 2.7K, to ensure maximum detail and clarity in your underwater shots. For smooth and cinematic footage, opt for a frame rate of 24 or 30 frames per second (fps). If you plan to create captivating slow-motion sequences, consider higher frame rates like 60 or 120 fps.
DJI action cameras offer various color profiles that allow you to customize the look of your underwater footage. Experiment with different color profiles, such as D-Cinelike or D-Log, to capture footage with a wide dynamic range. These profiles preserve more details in the shadows and highlights, giving you greater flexibility during post-processing to achieve the desired look.
Underwater environments have unique lighting conditions, and setting the appropriate white balance is essential for accurate color reproduction in your footage. DJI action cameras typically provide options like Auto, Sunny, Cloudy, and Underwater for white balance settings. For the best results underwater, set the white balance to Underwater “AWB” or “Custom” and adjust it manually. This helps the camera adapt to the specific lighting conditions beneath the surface and ensures accurate color rendering.
Adjusting the exposure compensation can help ensure proper exposure in various underwater lighting situations. While the automatic exposure setting can work well in many cases, it’s important to keep an eye on the exposure and make adjustments as needed. When using Auto Exposure, we recommend limiting the maximum ISO to 800 (100-800). Underwater scenes with bright surfaces like coral reefs or sandy bottoms may require slight underexposure to avoid overexposing the highlights. Conversely, darker scenes may benefit from slight overexposure to bring out details in the shadows. Regularly check the exposure and use exposure compensation to fine-tune your footage.
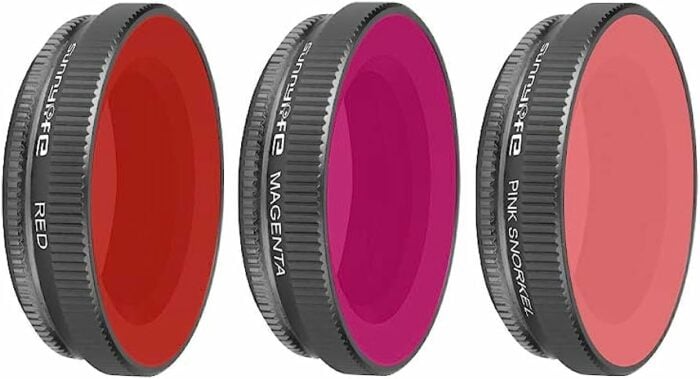
Using filters specifically designed for underwater photography can greatly enhance your DJI action camera’s performance in different water conditions. Filters help correct color casts caused by water’s natural tint and restore accurate colors in your footage. Consider using red filters for tropical or bluewater environments to restore warm tones, or magenta filters for green or freshwater environments to counteract the greenish hue. Experiment with different filters to achieve the best color rendition based on the specific underwater setting.
If your DJI action camera supports it, enabling the RockSteady feature provides advanced stabilization for smoother footage. This is particularly beneficial in underwater environments where water currents or movement can introduce camera shake.
Unlock the true potential of your DJI action camera’s underwater capabilities by optimizing the camera settings for the underwater environment. With the right resolution, frame rate, color profiles, white balance, and filters, combined with features like RockSteady, you can capture breathtaking underwater footage that showcases the mesmerizing beauty of the underwater world. Experiment, fine-tune your settings, and adapt to the unique lighting conditions of each dive to capture stunning underwater moments that will leave a lasting impression. Dive in and create unforgettable memories with your DJI action camera!
See DJI Action camera compatibility with Seavu.
GoPro cameras have become synonymous with capturing epic adventures, including the mesmerising world beneath the waves. To ensure you capture the best underwater footage with your GoPro, it’s essential to optimise the camera settings for the underwater environment. In this blog post, we will guide you through the best settings to use on your GoPro for stunning underwater footage. From resolution and frame rate to white balance and colour profiles, these settings will help you bring the underwater world to life in all its vibrant glory.
For capturing detailed and smooth underwater footage, select a high-resolution setting on your GoPro. Depending on the model, options like 4K, 2.7K, or 1080p are recommended. Higher resolutions provide more detailed images, allowing you to showcase the intricate beauty of the underwater environment. Additionally, choose a frame rate that suits your desired style of footage. For smooth, cinematic shots, 24 or 30 frames per second (fps) are ideal. If you’re capturing fast-paced action, consider higher frame rates like 60 or 120 fps for smooth slow-motion sequences.
Enabling the Protune feature on your GoPro gives you greater control over the camera settings, allowing for enhanced post-processing and colour grading options. Within Protune, you can adjust settings such as ISO, sharpness, and exposure compensation to fine-tune your underwater footage. Additionally, experiment with different colour profiles like GoPro Colour or Flat. GoPro Colour produces vibrant, punchy colours, while Flat provides a neutral colour profile that allows for more flexibility during post-processing, especially when colour grading.
Underwater environments have unique lighting conditions, and setting the appropriate white balance is crucial to achieve accurate and natural-looking colours. GoPro cameras offer several white balance options, including Auto, 3000K, 5500K, and Native. Start with the Auto white balance setting, which can work well in various underwater scenarios. However, if you notice colour casts or inconsistent hues, manually adjust the white balance based on the depth and water conditions. Experiment with different white balance settings to find the one that produces the most pleasing and true-to-life colours.
When shooting in challenging underwater lighting conditions, adjust the ISO and exposure settings in Protune to achieve optimal results. It is generally recommended to set the Max ISO to 400 to minimise digital noise in your footage. However, keep in mind that lowering the ISO may require adjustments to other settings such as exposure and lighting conditions. Adjust the exposure compensation to ensure your footage is properly exposed, taking into account the available light and the specific underwater environment. Balancing ISO and exposure will help you capture clear, well-lit footage with accurate colours.
Please note that individual shooting scenarios may vary, and it’s always a good idea to test and adjust settings based on the specific lighting and underwater conditions you encounter.
To improve colour accuracy and correct the colour cast caused by the water’s natural tint, consider using filters specifically designed for underwater use. Filters help restore natural colours and reduce the dominance of blue or green hues in your footage. Depending on the water conditions and depth, choose filters that suit the specific colour temperature of the environment. Some common filters include red filters for tropical or bluewater conditions and magenta filters for green or freshwater environments.
Capturing stunning underwater footage with your GoPro is an exhilarating experience. By optimising the camera settings, including resolution, frame rate, Protune options, white balance, and the use of filters, you can bring the vivid and captivating underwater world to life. Experiment with different settings, fine-tune as you go, and adapt to the unique lighting and conditions of each dive. With practice and the right settings, you’ll be able to create breathtaking underwater footage that showcases the beauty of the underwater realm.
See compatible GoPro cameras with Seavu


Typically replies within an hour
I will be back soon
Hey there 👋,
how can I help?


